






 Strains
 Guides
 Tools
Tools Support





Troubleshooting
Mushroom Side Pins: Why They Happen and What to Do
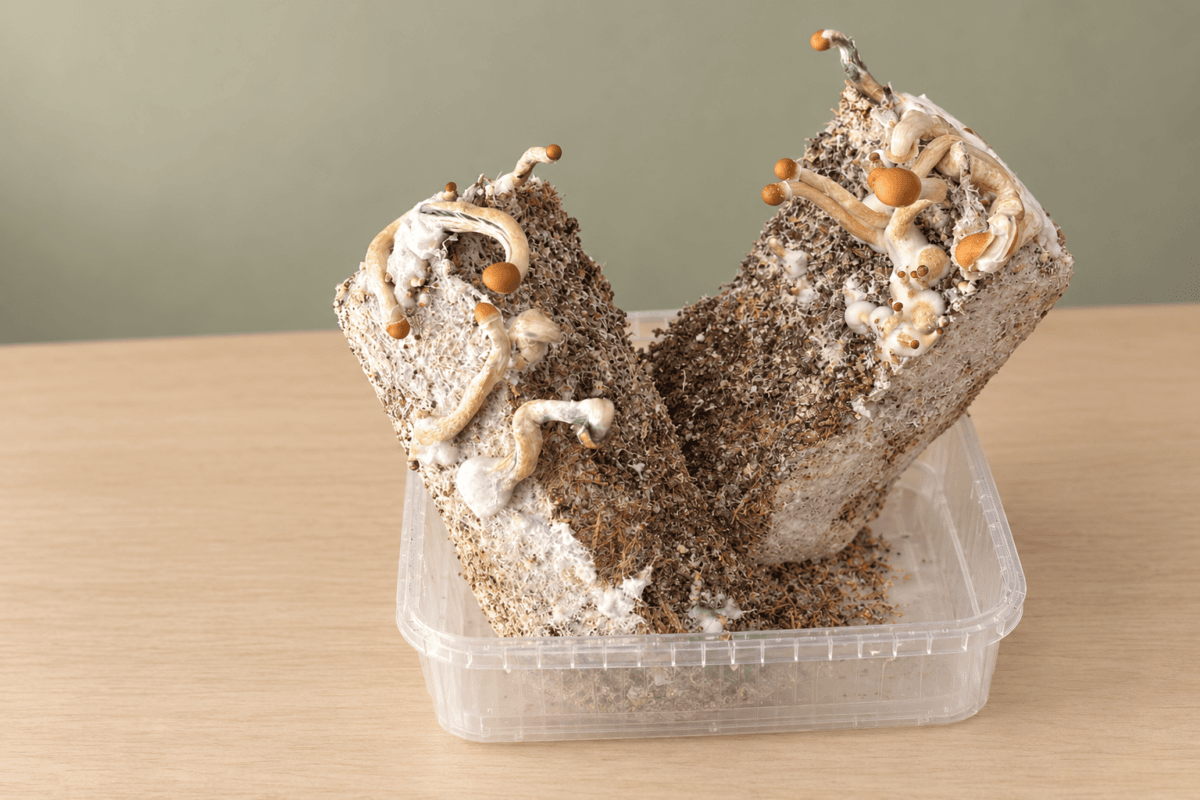
The first pins have appeared, which is normally the moment every grower has been waiting for. There is just one problem: they are not on top of the substrate. They are squeezed between the cake and the plastic container, and one or two may even be growing underneath it.
We receive quite a few photos of this at Mondo. The accompanying message is usually some version of: Is my grow kit going wrong?
In most cases, the answer is no. These mushrooms are called side pins. Pins underneath the cake are often referred to as bottom pins. They may grow in an awkward place, but they come from the same healthy mycelium as the mushrooms on top.
What their location does tell you is that the sides currently offer an attractive place to fruit. Understanding why that happens will help you decide whether to leave the kit alone or make a small adjustment.
What are mushroom side pins?
Side pins are simply young mushrooms developing between the colonised substrate and the wall of the container. They start in exactly the same way as pins on top. The available space is much tighter, so the stems may bend and the caps can look slightly flattened. Sometimes a mushroom appears to grow almost horizontally before curving upwards.
Seeing two or three side pins is nothing unusual. They can appear during a first flush, but become more common later because the cake loses water and slowly pulls away from the container.
Why do mushrooms grow along the sides of a grow kit?
To us, the top looks like the obvious place for mushrooms to appear. Mycelium does not see it that way. It reacts to very local conditions and forms pins where moisture, air and temperature happen to come together.
The thin gap beside the cake can offer exactly that.
1. A humid microclimate forms beside the substrate
The space between the cake and the plastic holds humid air surprisingly well. It is protected from direct airflow and does not dry as quickly as the exposed surface. To the mycelium, it can be a perfect little fruiting chamber.
This difference becomes more noticeable if the top is drying out. You then have a relatively dry open surface and a moist, sheltered strip around the edge. It is not difficult to see why the first pins may choose the latter.
2. The substrate naturally shrinks
A colonised cake holds a considerable amount of water. Some of it evaporates and some is used to produce the mushrooms themselves. As a result, the cake becomes a little smaller and pulls away from the plastic.
You will usually notice this more clearly after the first harvest. The new gap gives pins both a pleasant microclimate and enough room to form. This kind of shrinkage is normal; it is not evidence that the kit is dying.
3. The top surface has become too dry
The surface should not be wet enough to form puddles, but it should not become dry and dull either. Opening the bag too often, placing it near a fan or keeping it next to a radiator can make the top lose moisture faster than the sheltered edges.
4. Fruiting conditions are uneven
Small differences matter. One side may be closer to a warm window, while another receives more airflow. Even inside the same bag, the conditions are never perfectly identical.
An absolutely even canopy is satisfying to look at, but it is not the only sign of a successful grow. Living mycelium does not arrange itself for the photograph.
5. Light reaches the sides
Light gives developing mushrooms a direction, but it is rarely the whole explanation. This is why wrapping a container in tape often disappoints: the tape makes the sides dark, yet the humid gap is still there.
With a ready-made grow kit, there is little benefit in painting, taping or otherwise rebuilding the container. Getting the conditions inside the supplied grow bag right is far more useful.
Are side pins a sign of contamination?
No. A mushroom in an inconvenient place is still a mushroom.
Healthy side pins normally resemble the other pins in the kit, although they may be bent or compressed. Contamination is more likely to involve unusual colours, an unpleasant smell, slimy areas or growth that looks clearly different from healthy white mycelium.
If you are unsure about a colour or change in the substrate, compare it with our mushroom grow kit contamination guide or work through the Mondo Troubleshooting Center.
Are side pins bad for a mushroom grow kit?
Normally, no. If anything, they confirm that the mycelium is active enough to fruit.
The inconvenience is mostly practical. A mushroom trapped against the plastic is harder to harvest. If it runs out of space, it may stop developing. You do not want mature mushrooms or dead pins to remain hidden there for a long time, because ageing mushroom tissue eventually starts to break down.
Side pins deserve closer attention when:
- almost all mushrooms grow from the sides and none appear on top;
- the upper surface looks dry while the sides remain very wet;
- mushrooms are tightly trapped and cannot continue developing;
- old pins remain behind after a harvest;
- you also notice unusual colours, odours or slimy patches.
If mushrooms are growing both on top and along the sides, you can usually allow the flush to continue normally.
What should you do when side pins appear?
The best response is often less dramatic than growers expect. Do not pull the cake out, flip it over or change every part of the setup at once. Unnecessary handling creates more risk than a few side pins do.
First, see whether they have room
If there is enough space between the cake and the container, leave the pins alone. Many continue to develop perfectly well, even if their stems become curved.
Avoid repeatedly touching the container or pressing against the mushrooms to inspect them.
Then look at the kit as a whole
Condensation inside the grow bag tells you that moisture is present. It does not tell you everything about the surface of the cake, though. A bag can be covered in drops while one exposed patch dries more quickly than the rest.
Follow the instructions for your specific product. With a Mondo Grow Kit, water is sprayed onto the inside of the grow bag when extra humidity is required—not directly onto developing pins or mushrooms. Once the first pins appear, stop spraying and focus on appropriate fresh-air exchange.
Resist the urge to keep adjusting it
Place the kit in a bright location with indirect light and avoid direct sunlight. Keep it away from radiators, strong fans and sudden temperature changes.
Use the instructions supplied with your kit as the main reference. You can also consult the complete Mondo Grow Kit Manual for the correct activation and fruiting routine.
Watch the flush, not a single mushroom
One pin can stall while the rest of the flush develops normally. Look at the pattern over several days instead of judging the entire kit by its strangest mushroom.
Our free Grow Tracker can help you recognise the current growth stage and understand what normally happens next.
How do you harvest mushrooms growing along the side?
Start with the accessible mushrooms on top. Wash and disinfect your hands or use clean gloves, and avoid touching the substrate more than necessary.
For an accessible side mushroom, gently grip it near the base and use a controlled twist-and-pull motion. Do not scrape aggressively against the substrate or dig into it with a tool. If a mushroom is still very small and developing normally, you can allow it more time to grow.
If one is tightly trapped, do not wrestle the cake out of its container halfway through the flush. Wait for the main harvest unless the mushroom is clearly deteriorating. Once the flush is finished, remove the mature side mushrooms and any reachable remnants before preparing the kit again.
Never leave mature mushrooms hidden along the sides before soaking or restarting the kit. Old mushroom material may decay and compromise the next growing cycle.
For more detail, read our guide on when and how to harvest magic mushrooms.
How can you reduce side pins during the next flush?
You probably will not prevent every side pin, particularly once the cake starts shrinking. That is fine. The useful goal is to keep the top from becoming less inviting than the sides.
Do not improvise the activation
Good hydration at the start gives the cake a better chance of staying balanced throughout the flush. Follow the soaking and draining instructions for the product rather than adding an extra hour because an anonymous forum post recommends it.
Keep it away from constant dry air
Do not place the grow bag next to a fan, open window, air conditioner or heater. Constant dry airflow can remove moisture from the top surface faster than from the sides.
Fresh air is still important. The difference is between brief, controlled fresh-air exchange and continuous airflow that dries the kit.
Humid does not mean soaking wet
When the manual tells you to add humidity, spray the inner walls of the bag rather than the developing mushrooms. The aim is to maintain a humid growing environment, not to leave pools of water on the substrate.
Give the cake some peace
Lifting, squeezing or repeatedly moving the substrate can create new gaps along the sides and disturb the developing network of mycelium. Leave the kit in a stable position throughout the flush whenever possible.
Expect a few more side pins later
The substrate will naturally become smaller after producing mushrooms. This means some side pinning during a second or third flush may be unavoidable.
Remove all mature mushrooms and visible remnants, then follow the rehydration steps for your kit. Our guide to second, third and fourth flushes explains what to expect as the grow continues.
Should you cover the sides of a grow kit?
Covering the container is one of those tips that gets repeated so often online that it begins to sound like a rule. It is not. Darkness alone does not stop pins from forming. The humid space beside the cake still exists under the cover.
A dark cover may hide light without correcting moisture or airflow differences. It can also make it harder to monitor mushrooms or changes along the sides of the kit.
Mondo Grow Kits are designed to be used in their supplied container and grow bag. There is no need to paint, tape or permanently modify the container. Consistent fruiting conditions and correct use of the grow bag are more important.
Side pins versus an unhealthy grow: how can you tell the difference?
Side pinning on its own is usually harmless. Look at the complete kit before deciding that there is a problem.
Signs of an active, healthy grow may include:
- white mycelium;
- normal mushroom pins on the top, sides or both;
- a fresh, earthy mushroom smell;
- steady development over several days;
- condensation or a humid environment inside the bag.
Possible warning signs include:
- green, black, pink or bright orange patches;
- a sour, rotten or strongly unpleasant smell;
- slimy substrate or mushrooms;
- widespread stalled pins that are darkening and deteriorating;
- rapid, unusual changes that do not resemble mushroom growth.
When in doubt, avoid opening and handling the kit repeatedly. Take clear photographs through the bag where possible and contact Mondo support with your order number.
Frequently asked questions about mushroom side pins
Yes. If they have enough room, side pins can develop into mature mushrooms. Their stems may curve or their caps may look compressed because they are growing in a narrow space.
Usually not. Leave healthy side pins in place when they have enough room to develop. During harvest, carefully remove mature side mushrooms and any accessible aborted pins so that no old mushroom material remains behind.
The space beside the substrate may be more humid and protected than the exposed surface. Check whether the top is drying too quickly because of excessive airflow, unstable temperatures or frequent opening of the grow bag. Continue following the product instructions and avoid making several sudden changes at once.
Not always. The substrate naturally shrinks as it loses moisture, especially after the first flush. This can create a gap where side pins develop. However, a dry top surface combined with many side pins may indicate that moisture is being retained better along the sides than on top.
They form for the same reason: the area around the substrate provides suitable conditions for fruiting. Bottom pins simply grow underneath the substrate, which gives them less room and makes them more difficult to reach.
Do not turn or remove the substrate during an active flush simply because you see bottom pins. This may damage the mycelium and increase the risk of contamination. Allow the accessible mushrooms to develop and carefully remove trapped remnants during harvest.
Not automatically. Side pins are part of the same flush and may still develop into mature mushrooms. The final yield depends on factors such as genetics, moisture, environmental stability and the overall condition of the substrate—not only on where the mushrooms appear.